Saturday 30 April 2022

"29, Let's Go": Turn 4, Flanking attack at St Germain-du-Pert


"29, Let's Go!": Turn 4, Flanking attack at St Germain-du-Pert

The US column cannot advance with the threat of mobile anti-tank guns on their flank. The Americans must clear the village of St Germain‐du‐Pert before progressing. They have worked their way around behind the village to launch a flank attack. 

Map


A dirt road leads into the village. The village is dominated by a church and churchyard. Across the road from the church is a cottage with a walled garden. There are hedgerows with planted fields to the south. The western side of the map is mainly an open field. 

Support Choices

The German player has a fresh platoon of infantry with two Marders in support for this scenario. 

US: Sherman (6), Sherman (6), 60mm mortar (3), sniper (3), additional BAR for all squads (1). 

Combat 

GIs have moved stealthily behind the hedgerows, flanking around the rear of the village. The American plan was to attack with tanks along the road into St Germain-du-Pert (drawing the Germans’ attention), while infantry infiltrated around the flank. 

The US 1st Squad took cover behind a stone wall, trying to locate the Germans. They had pushed up -right into the village - without encountering any enemy troops. 

Suddenly a high velocity shell whistled over their heads, and several GIs were hit and killed by machine gun fire from a nearby Marder that was lying in wait. 

The German troops defending St Germain-du-Pert were led by a tough veteran feldwebel. He personally led an assault on the surprised US 1st Squad. He threw a grenade around the cottage, which killed a GI, and then led an assault into the remaining GIs. The disoriented GIs were all brutally killed with bayonets, rifle butts and entrenching tools. The Germans didn’t lose a single man. 

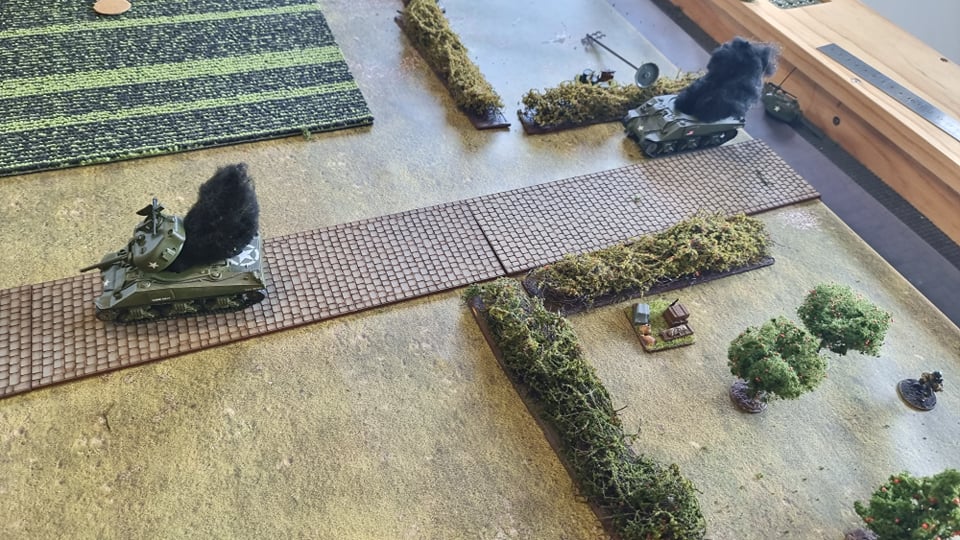
Being ambushed was a shocking start for the Americans but they soon struck back.  A Sherman tank coming along the road had a badly obscured view of the Marder. The Sherman gunner decided to take the shot. It was a direct hit, and even struck a weak spot in the Marder’s armour. The Marder burst into flames. The Sherman coaxial MG then wiped out a German LMG team that was covering the road. 

Feldwebel (SL) and German 1st Squad prepare for assault on unsuspecting GIs


Sherman next to abandoned German field wagon

First Marder burning

The feldwebel moved with German 1st Squad to capture a nearby American jump-off point. A second Sherman rumbled along the road. 

The feldwebel and his men were fired upon by a sniper, a Sherman and US 2nd Squad. The feldwebel decided he and his men were too exposed: he threw a smoke grenade, and he and his men crept back behind the cottage. 


Febelwebel orders his men to lay low and retreat behind the cottage

Two Shermans approaching the village

The second Marder appeared on the road, shielded from American tanks by the Church. It fired HE rounds and machine-gun fire at the US 2nd Squad, which was lining a hedgerow across from the cottage. The Marder would remain in the same spot, continuing to fire on those same GIs.  


German 2nd Squad had deployed in the church, firing from the windows, mostly at US 2nd Squad. US 2nd Squad returned fire. The continuous combined fire of US 2nd Squad and two Shermans left most of German 2nd Squad dead. Its two remaining survivors fled the church and linked up with the feldwebel - who had moved with the remains of German 1st Squad into the churchyard. 

German 2nd Squad occupying the church

Remaining two riflemen from 2nd Squad join with 1st Squad

US 3rd Squad now appeared, advancing carefully into the village - the bodies of US 1st Squad evident in front of the stone wall to their right.

The only German troops left appeared to be the feldwebel and a few riflemen giving sporadic rifle fire from the churchyard. 


The Shermans continued to move cautiously down the road. A Panzerschreck team fired at the lead Sherman from the churchyard. The 'schreck missed. The Sherman fired back with its MG. The main gunner followed the tracers and obliterated the 'schreck team with a direct HE hit.


'Schreck team is obliterated

German 3rd Squad appeared beside the burning Marder, intent on ambushing US 3rd Squad. [Cam played a COCA Interrupt]. The US squad leader spotted the Germans; “Down, down, down!” he bellowed, and a second later machine gun fire whizzed over his men as they all hit the dirt. The GIs then returned fire, which was murderously accurate at close range. 

Some of German 3rd Squad was also visible to a Sherman, which cut more of them down with MG fire. 

The flanking GIs brought up a bazooka and began firing at the remaining Marder. 

The German feldwebel had inspired most of his men to fight and die in position rather than retreat. But when he was hit and killed by US rifle fire, the few remaining Germans fled the village. The crew of the surviving Marder bailed out and abandoned their vehicle. The sole survivor of German 3rd Squad put his hands up, shouting “Kameraden! Kameraden!” 

Shermans move in on the village


GIs bring up a bazooka to fire at the remaining Marder

“Down, down, down!” - US 3rd Squad going tactical


Remaining German who surrenders

Results

German casualties: 28

US casualties: 16

The US flank is secure for now and they can continue their advance. 

"29, Let's Go!": Turn 3, Delaying action at Arthenay

“29, Let’s Go!”: Turn 3, Delaying action at Arthenay

The US encounters German resistance in the hamlet of Arthenay. The GIs must clear this position before they can progress further along the highway. 

Map


The main highway bisects the map. The German table edge has two farm sheds (one is ruined). It also has a large two storey farmhouse, and a long L-shaped barn with a house attached. The American table side has an orchard and hedgerows. The field to the north is planted with crops. 

Support choices

Germans: Mortar observer (4), HMG (4), adjutant (1), entrenchment (1). 

The Germans also have off-map support. Two Marder III tank destroyers from Panzerjäger-Abteilung 352 are overlooking the highway from an elevated and concealed position near St Germain-du-Pert. 

US: Sherman (6), Sherman (6), 60mm mortar (3), sniper (3), additional BAR for all squads (1). 

Combat 

The outskirts of the hamlet of Arthenay were eerily quiet as the Americans approached. Scouts had spotted enemy movement in the hamlet, although as yet the enemy’s exact position was unclear. But, the US commander thought to himself, it didn’t take a tactical genius to know the two-storey farmhouse was a prime position for a German machine-gun. 


The Americans congregated along the hedgerows. The US commander did not advance his troops, but deployed a powerful base of fire along the hedgerows: 1st and 2nd Squads (with extra BARs), a 60mm mortar, a sniper and a Sherman tank. The US commander was going to utilise his ample supply of troops and ammunition to full effect before advancing into the hamlet. 

At this point German troops began firing from the upper floor of the farmhouse. OLt Kleinmann, also in the upper floor, couldn’t believe his luck: the Americans were all clustered in the pre-registered zone for a 80mm mortar barrage. The mortar observer (crouched beside Kleinmann) relayed firing orders on the field telephone. 

Soon the GIs were cloaked in drifting smoke as mortar bombs exploded around them. US 1st and 2nd Squads were both pinned. A jagged splinter struck and killed the US commander. 


All US troops deployed, along with 60mm mortar, sniper and Sherman. Red markers show area of German 80mm mortar barrage

The Sherman tank was struck by a mortar shell, which startled the crew. They rolled forward to get out of the bombardment, opening up with MG fire and an HE shell at the farmhouse. 

Without warning, the Sherman was struck in the side by a 75mm shell from a concealed Marder III on a nearby hill. The Sherman immediately brewed up with thick black smoke.

[At this point some unlikely rolls occurred: Cam ended the turn with a COCD. I spent a COCD to continue the mortar barrage. Then in my phase I rolled three 6’s - thereby ending the new turn. I decided not to use my last COCD and instead risk rolling for the mortar battery’s continued availability. I rolled a 1!]

The mortar barrage stopped. The observer demanded down the receiver: 'why had the bombardment stopped?' The reply came: 'rounds out, sir!' The observer cursed the ammunition situation.


Burning Sherman victim of a Marder ambush

The now un-pinned US troops began pouring fire at the upper storey of the farmhouse. The German squad in the farmhouse began taking casualties and shock. And its squad leader was wounded by a sniper’s bullet. A second Sherman appeared along the road and added its firepower. 

The German 2nd Squad was deployed along a hedgerow beside the farmhouse. It exchanged fire with US 2nd Squad. It also tried unsuccessfully to spot the US sniper’s muzzle flash. 


German 2nd Squad (JL lightly wounded by grazing shot from US sniper)

US 3rd Squad had arrived, deploying alongside US 1st Squad in the orchard, and had also been firing at the farmhouse upper storey.

The German 3rd Squad ran into the combat area and took up a defensive position within the L-shaped stone barn.

The Germans deployed an HMG into a hastily dug fighting position alongside the farmhouse. The HMG opened fire on US 2nd Squad. 

German 3rd Squad arrives and runs toward the stone barn

German HMG position

US 2nd Squad was taking machine-gun fire from four different MG-42s (including one in the heavy configuration). This was too much incoming fire to handle and the surviving GIs broke and retreated in disarray.

US 2nd Squad flees to the rear

A Panzerschreck team crawled forward and ambushed the second Sherman. The rocket hit the tank dead-on and knocked it out. 


Second Sherman brews up

The GIs continued to pour fire on the farmhouse. OLt Kleinmann was hit and wounded. The troops in the farmhouse had taken the brunt of US fire and it became too much - they fled, carrying their unconscious CO with them.  

Germans in the farm house with lots of shock tokens

On the US left flank, a doughty US Platoon Sergeant took command of GIs in the orchard. He urged them forward; over the hedgerows and toward the stone barn. He knew his men’s nerve was wavering, but he’d noticed the German fire had slackened. “C’mon boys, over that hedge and advance,” he encouraged. 

Both sides had precarious morale. 

The GIs moved to the next hedgerow exchanged fire with German 3rd Squad, which was defending the barn. The greater weight of fire from the GIs was decisive and German 3rd Squad stopped firing and hunkered down. 

US Sergeant next to 60mm mortar

US troops gingerly advance on the hamlet due to slackened German fire


The barn was now blocking German visibility from the other side of the road. The GIs were entering an advantageous dead zone and flanking the whole German position. German 3rd Squad was soon going to be trapped in the barn. It therefore fled the barn and headed to the rear. The remaining Germans in the hamlet followed suit. 

Results

Each side took 7 casualties: 3 KIA, 2 wounded and 2 lightly wounded. 

My outlook went from relaxed to retiring. My CO’s opinion went down one. 

The Americans had taken Arthenay but the Marders overlooking the highway from St Germain-du-Pert would need to be taken out before the American column could safely continue the advance to Isigny.  

"29, Let's Go!": Turn 2, Probe at La Cambe (No. 2)

“29, Let’s Go!”: Turn 2, Probe at La Cambe (No 2) 

Forward elements of the 175th try again to take La Cambe. 

Map

Support choices

Germans: Pak 40 (7), sniper (3), two entrenchments (2) 

US: Sherman (6), Sherman (6), Sherman (6), additional BAR for all squads (1), 60mm mortar (3), sniper (3) 

Combat 

Both sides started on 8 morale. 

German infantry remained dug-in along the hedgerow in front of the stone cottage. They had a clear view of the road and were well protected with entrenchments and concealment.  

The US 1st Squad deployed directly opposite the German infantry, exchanging fire across the cabbage field again. Fortunately this time there was no infantry gun blasting away with 13lb high explosive shells.


Dug-in German infantry


German sniper team (who proved unskilled!)


A German sniper team had nestled into the hedgerow by the orchard. This inexperienced German sniper missed each of his shots during the engagement. 

The US 2nd Squad deployed in front of the wooden shed. Behind the wooden shed a platoon sergeant bellowed at a 60mm mortar team to begin firing. 

US 2nd Squad with mortar behind


"Get that mortar firing!"


A US sharpshooter deployed near US 2nd Squad. He winged a German NCO, but the NCO only suffered a grazing shot. 

US Sharpshooter and spotter


In the previous attack, the GIs had taken out the Germans’ HMG and infantry gun. The German commander (Oberleutenant Kleinmann) became concerned about being over-run by US infantry. So he ordered a Pak-40 concealed in the orchard to begin firing HE rounds at the US infantry. 

German Pak-40

German defenders

Revealing the high velocity anti-tank gun was a grave error. Its shells caused some shock amongst the GIs. But the GIs concentrated return fire on the Pak’s position. Focused and accurate rifle fire, along with sniper fire and 60mm mortar bombs soon killed most of the Pak crew. The two remaining crew members were left hugging the dirt in fear. The Pak’s commander had been shot in the head by a sniper. Kleinmann’s best defence against Allied armour had been eliminated. 

The Pak was out of action. With the sound of Sherman engines growing louder, and sensing his position would be out-flanked, OLt Kleinmann ordered a withdrawal to the hamlet of Arthenay. 

Results

A short while later, the nearby German Flak 88s were destroyed - they were easy pickings without infantry support. 

A friendly fire incident occurred when planes bearing Allied markings strafed the US troops as they were leaving the hamlet. Colonel Goode, the CO of the 175th, took advantage of the break in the advance to establish his Regimental HQ in La Cambe.

Casualties: 

I forgot to record these before they were erased on the whiteboard where we keep running game info! But both sides had very light casualties. 


"29, Let's Go": Turn 4, Flanking attack at St Germain-du-Pert

  "29, Let's Go!": Turn 4, Flanking attack at St Germain-du-Pert The US column cannot advance with the threat of mobile anti...