Saturday, 3 April 2021

"All American": Turn Four, Holding the Line at Cauquigny (no. 2)

 Turn Four: Holding the Line at Cauquigny (no. 2)

The Germans try once again to dislodge the US paras from Cauquigny. 

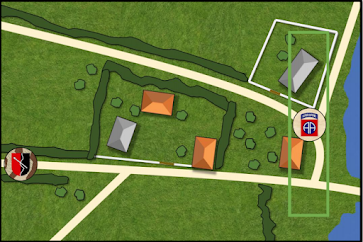
Map


Support Choices


German support: Mortar platoon observer (5) and Panzer III (5) 

US Support: Parachute Squad with Junior Leader (5)

Platoon Leaders


Feldwebel Semmler commands the German platoon, and Lt. Bond commands the Airborne. These platoons have been used previously, so Semmler's platoon begins 4 men down from full strength, and Bond's starts 2 men down. 

Combat


German morale started high enough (11, reduced to 10 by low Men’s Opinion). And this time Feldwebel Semmler was in command. He was opposed by Lt. Frank Bond, who had given the Germans a bloody nose in the very first game. 

The objective JOP for this scenario was once again behind the church. 

The game started well for the Germans, with the patrol phase giving me a JOP in the stone farmhouse and a double phase allowing me to push my troops up (within the cover of the farmstead) fairly quickly. 

Germans have infiltrated into the farmstead before the engagement


Germans move up quickly using the farmstead for cover

The US 1st Squad deployed in the churchyard along the wall - allowing them to cover the road. Platoon Sergeant Donald Bryan and a 60mm mortar deployed behind the church. 

US 1st Squad covering the church road 

The Germans brought forward an observer for an 80mm mortar battery. Mortar bombs began exploding all around the church, pinning 1st Squad and Platoon Sergeant Bryan. 

German mortar platoon observer gets up close


The churchyard comes under heavy mortar fire


The German 2nd and 3rd squads tried to leave the cover of the farmstead and advance along the road toward the causeway - but they came under fire from the US 2nd Squad. Conscious of what happened to their comrades last time (i.e. being caught in enfilade fire), the Germans disengaged and took shelter again within the farmstead. 

The Germans soon return to the safety of the farmstead

The US third squad - a scratch force of mis-dropped 101st boys, not normally part of Bond’s platoon - deployed in the double-storey house. Their LMG team took up position in the top floor windows, ready to fire at any Germans pushing up over the hedge which bordered the farmstead. 

By now all three of the German junior NCOs had been lightly wounded or wounded. 

A Panzer III arrived and moved along the road toward the causeway. It fired at Sergeant Nicholas Sargent’s 2nd Squad, killing one man. 2nd Squad repositioned behind the double-storey house. 

Panzer III arrives

At this point I shifted the barrage 6 inches so it caught Cam’s troops in the double-storey house. The LMG team on the second floor was pinned. Per the Official FAQ, the rifle team on the bottom floor was not pinned but still rolled for hits. The US 1st Squad and senior leader in the churchyard remained caught in the barrage and pinned. 

The Panzer III turned and smashed through the farmstead’s stone wall, beginning to move into the farmstead itself. Having exposed its side armour, the US bazooka team appeared (beside the double-storey house) and fired at the panzer's side armour. The bazooka rocket destroyed the panzer’s hull MG and spooked the crew. But in the subsequent phase the panzer fired on the bazooka team with its coaxial machine gun, killing one man and pinning the survivor. 

Take the shot!


Bazooka Team gets hit

The US 1st Squad, hoping the panzer would be dealt with by the bazooka, had dashed across the road to return to its position behind the hedge. 

Semmler moved up with the German 1st Squad, assembling his whole platoon together in the farmstead for an assault on the US 2nd Squad. He also detached a two-man scout team to go on a long flank around the church to capture the objective JOP. 

Cam knew I had a chain of command dice so I could keep the barrage firing into the next turn. He couldn’t end the turn because he didn’t have one yet anyway. The barrage wasn’t going to end any time soon. 

So the Americans withdrew hastily across the causeway. Of the pinned soldiers (who had to retreat through the mortar barrage), 6 were dispersed and 3 were captured. 

The Germans had captured Cauquigny but now came the tough challenge of capturing the Mederet causeway and La Fière bridge. 

Results

US casualties: 6 dispersed incl platoon sergeant (SL), 3 captured, 4 KIA. 

German casualties: 4 KIA. 

German. Men’s opinion -2, CO’s 1.
US. Men’s opinion 5, CO’s 1. 


Friday, 2 April 2021

"All American": Turn Three, Holding the Line at Cauquigny

 Turn Three: Holding the Line at Cauquigny

With the inundated fields just behind them, the Americans center their defense on a church near the water. The Germans move to try and secure access to the causeway.

Map


At the center of the map is a farmstead with stone buildings and a half-timber barn. The US table edge has the shore of the flooded fields, and a medieval stone church and graveyard. There is also a two-storey house and stone fountain near the US table edge. There are two roads leading into Cauquigny, the upper "church road", and the "causeway road" which leads directly onto the causeway. All of the buildings count as hard cover, as do the stone walls. None of the sparse trees offer cover. The flooded areas counts as Really Heavy Going terrain. Troops caught in this terrain count as being in the open, with no ability to go Tactical nor move At the Double. No vehicles may enter the inundated fields.


Support Choices

German Support:  R35 light tank (4), HMG team (4), Satchel charge (1), Adjutant (1). 

Wild Card: Armored First (one Panzer III at no cost in Support Points)

US Support: Parachute Squad with Junior Leader (5)

Wild Card: Bazooka Forward! (add one Bazooka Team in no Support Points. In addition, start the game with one full Chain of Command Die.) 

Platoon Leaders


German platoon commander is Feldwebel Friedberg. He was a waiter at a fancy restaurant before the war. He likes to pretend he has ties to aristocracy (claiming to be the illegitimate son of a noble family) 

US platoon commander Lt. Dwight Patrick - known as “Hat-Trick Patrick” to his men. Like Foxhole Harvey, he is also from Mid-West, but he is a much better leader than Foxhole Harvey. His nickname comes from his reputation as a shrewd leader. 

Combat


Starting moral for Germans was 8 and for the US was 11. 

The German objective was to capture an Airborne JOP which was behind the church. 

The German 1st Squad appeared at the center of the German table edge and moved up toward the farmstead. A Panzer III rumbled forward on the road toward the church. 

US 1st Squad deployed in the church. Two men were sent to the top of the church-tower to act as spotters for the 60mm mortar, which had deployed behind the church along with the platoon sergeant. The rest of US 1st Squad took up positions in the church, covering the church road, but it didn’t really see any action in this game; the Panzer III stayed down the road, unwilling to advance without infantry support, and the German advance (schwerpunkt) was on the German right flank - down the causeway road. 

Mortar spotters wisely do not open fire

US 1st Squad takes up position inside the church


The remaining two German squads were deployed on the German right flank, along with support from a tripod-mounted HMG.  The German 2nd Squad advanced down the road, hugging the stone wall of the farmstead. A short while later the German 3rd Squad took up a position near some trees to cover the 2nd Squad's advance. The HMG team also took up position beside these trees. 

Sergeant Louis Ross (US 2nd squad) was deployed in the farmstead. He ordered his men to withdraw from the farm via dense hedgerow behind them. Ross was worried about getting flanked by Germans, but it was too late, his men were unable to clamber through the hedgerow, and so he told his men to turn and fight. They would take heavy fire from three MG-42s but managed to be relatively unscathed - through a good deal of luck more than anything else! Clearly the sun was in the Germans' eyes. 

The Germans advance on their right flank

US 2nd Squad are seemingly caught with their pants down

However, perhaps Sergeant Ross's squad was just acting as bait? An unexpected third US squad - a scratch force - appeared at a hedgerow by the rear house, covering the road toward the causeway. They caught the German 2nd and 3rd Squads and the HMG team in the open.  

The US 2nd and 3rd squad gunned down the HMG crew. 

US 2nd Squad catches Germans in cross-fire with unexpected third US squad

A Renault light tank crawled along the road to support the main German advance. The R35 fired its 37mm cannon at the US 3rd Squad but without much effect. 

The German attack is stalled 

Feldwebel Friedberg moved up in support of the main German advance - which seemed unable to eliminate Sergeant’s Ross’s men in the farmstead, and was being chewed up by the unexpected third US squad. This US squad had the German 2nd Squad in a perfect enfilading fire position. 

The advance along the causeway road had come to a complete halt. 

The German 1st Squad wasn’t exposed to enemy fire - so it crossed the hedgerow and moved into the farmstead,  intending to assault Sergeant Ross’s US 2nd Squad. But the German 1st Squad moved too nervously and slowly and did not get close enough. 

The Panzer III advanced toward the church and fired its gun at the occupants, but it was too little too late. 

With the German 2nd and 3rd Squads suffering heavy casualties, and the 2nd Squad becoming pinned,  Feldwebel Friedberg ordered a retreat.  Obergefreiter Henzler (leader of 2nd Squad) managed to rally his men, unpinning them, so they could slip away under fire. 


Results

Germans suffered 12 casualties: 6 KIA, 3 wounded, 3 were able to immediately return to active duty
US suffered 4 casualties but all were able to immediately return to active duy. 

German forces, Men's Opinion fell to -3, and US Men's Opinion was raised to +6.  


"All American": Turn Two, Probe Along the Road (no. 2)

 Turn Two, Probe Along the Road (no. 2)

The first German attempt to push up the road toward Cauquigny failed. The Germans make another attempt. 

Map


Support Choices


Germans: R35 light tank (4) and pre-game barrage (2)
US: 3-man team with LMG on bipod mount (3)


Platoon Leaders


US Airborne platoon commander is Lt Ollie Harvey, a farmer’s son from Nebraska. He earns the nickname “Foxhole Harvey”. 

German platoon commander is Feldwebel Emanuel Semmler. Raised by a middle class family from Cologne, his father was a decorated soldier in the first world war. Known as an aggressive attacker and Eastern Front veteran. 

Combat


The Germans tried to soften up their opponents with a barrage of mortar fire (pre-game barrage). 

The combat began with the Airborne deploying a 60mm mortar in the orchard. Platoon Sergeant Frank Rogers came alongside the mortar crew to direct their fire. 

The US 1st Squad deployed along the hedgerow perpendicular to the road, positioning to cover the road and the copse of trees opposite them. A bazooka team deployed alongside 1st Squad. 

Germans deployed their 1st Squad along the diagonal hedgerow and their 2nd Squad in the copse of trees. 

The US 2nd Squad and Lt. Harvey don't deploy because the heavy barrage of mortar fire kept them hunkering in cover. Some bad pre-game barrage rolling by Cam ! 

The German 1st Squad sent off a two-man scout team to rush along the diagonal hedgerow and toward the US table edge. 

The rest of the German 1st Squad attempted to cross the thick diagonal hedgerow but got stuck in the thick foliage (bad movement roll!) and didn't make it across. The troops eventually muscled their way through the thick hedge, but quickly returned to the other side of the hedge when fired on by the US 2nd Squad (which had now deployed in the orchard).  The German two-man scout team was also fired upon, and went tactical, the two men hugging the ground and not advancing for the rest of the game.

The German R35 appeared on the road. It moved up the road, killing a paratrooper with its MG but then bursting into flames after a well-aimed bazooka hit.

There was now two German squads in the copse of trees, along with Feldwebel Semmler personally directing MG-42 fire (using Machinegewehr ability). The US 1st Squad was taking heavy fire. Sergeant Jesse Logan was wounded, and his squad became pinned. 

Obergefreiter Niclas Kuhn then led six riflemen forward to assault the pinned US 1st Squad, preparing for a hail of grenades followed by close quarters assault. 

Obergefreiter Kuhn leads riflemen forward to assault the pinned US paras


With Lt. Harvey not on the field, Sergeant Logan wounded, 1st Squad pinned and about to be overrun, the entire Airborne platoon withdraws in a hurry toward Cauquigny. 


Results


US: 2 KIA, 2 POW, 1 wounded, 4 men dispersed

Germany. 2 KIA, 2 wounded. 


"All American": Turn One, Probe Along the Road


Turn One, Probe Along the Road

The German attack has begun with troops and tanks pushing down the road toward Cauquigny. The Germans encounter the perimeter of the American Airborne forces and seek to quickly drive them in. 

Map


There is a dirt road with hedgerows on either side. While not the sturdy bocage that will be encountered in some parts of Normandy, these hedges still present a challenge to cross and count as medium obstacles. Units within 2” of the hedge may see through it and be seen by enemy units on the opposite site. Units being fired upon through a hedge count as having light cover.

The map is dominated by an orchard. On the German edge of the map there is a copse of trees. 

Support Choices


German support: additional senior leader (2) and one Renault R35 light tank (4). 

Airborne support: Add SMGs to Squad* (1) and an extra bazooka team (2). 
*Two M1 Garands replaced with Thompson SMGs. 

Platoon Leaders


German platoon commander is Feldwebel Konstantin Hermann: a young NCO and former Hitler Youth leader. 

 Airborne platoon commander is Lieutenant Frank Bond: a former Wall Street trader from New York.

Combat 


German morale began high on 11. The German 1st Squad appeared and moved along the diagonal hedgerow, with an R35 tank arriving and covering the road with overwatch. The German plan was to hug the diagonal hedgerow, moving along it, and flanking the US Airborne. 

A US 60mm mortar deployed in the orchard and began peppering the Germans with mortar bombs. A squad of airborne (1st Squad) appeared and opened up on the Germans from the orchard. The German 2nd Squad also deployed at the diagonal hedgerow in front of the orchard. 

US 60mm mortar in the orchard

German 1st and 2nd Squads strung along the diagonal hedgerow

The third and final German squad deployed in the copse of trees on the left of the road, and exchanged fire with the US 2nd squad (which was covering the road), and also attempted to kill or drive away the bazooka team which had deployed there. The US bazooka team fired several rockets at the R35 but the shots either missed or ricocheted off the armour. The R35 fired back with its 37mm cannon but its shots were inaccurate and didn't kill anyone. 

German 3rd Squad and R35 tank exchange fire with US 2nd Squad and Bazooka Team

The German 1st Squad came under heavy fire from the orchard (and continued to be mortared). It became pinned so it went tactical (hugging the ground) and its junior leader threw a smoke grenade to provide cover. But the smoke cover cut both ways. Sergeant Nick Sargent (“Sarge”) of the US 1st Squad took the opportunity to rush his men out of the orchard to the hedgerow and spray the German 1st Squad with Thompson SMGs at close range. Sarge's squad had previously exchanged some of its Garands for Thompsons. The Germans either got riddled with bullets or ran away. 

Nick Sargent and US 1st Squad assault with SMGs

The German plan to flank the Americans by hugging the diagonal hedgerow did not go well. With his 1st Squad effectively wiped out (and 3rd squad almost pinned), the German platoon commander ordered a withdrawal. The German platoon managed to withdraw in an orderly way except the leader of 1st Squad who was captured by Sergeant Sargent’s squad. The second German senior leader (a leutenant) did not even appear on the field. His men were retreating before he’d left the assembly area. 

Results


Germans suffered 7 casualties: 4 KIA, 2 wounded, and one POW. 

Airborne suffered 2 casualties: 1 KIA and 1 wounded. 

US: At the beginning of the campaign C.O.’s opinion is 1. Men’s opinion is 1. This changes to CO’s opinion 2, and men’s opinion 3. 

Germans: At the beginning of the campaign C.O.’s opinion is 0. Men’s opinion is 2. This changes to CO's opinion -1 and men’s opinion 0. 

Each commander's outlook remains unchanged. 

I play wild card “Panzer Marsch” to avoid passing the initiative to US Airborne.

Intro: "All American: The Battle for La Fière"


"All American: The Battle for La Fière, 1944"

A campaign for Chain of Command by William Thorpe


My friend and Chain of Command opponent Cam had already painted a US Airborne platoon, having been inspired by Band of Brothers. We therefore looked for “Pint Sized Campaigns” which featured US Airborne and found William Thorpe’s “All American: The Battle for La Fière”. 

Opposing Forces 

Cam is playing elements of the 82nd Airborne Division, one of the best light infantry divisions in the entire US Army. The 82nd “All American” Airborne Division was an exceptionally well-trained unit with combat experience in Sicily and Italy. 

As the German player, I will be playing elements of the 1058 Grenadier Regiment (91 Air Landing Division) and Panzer-Ersatz-Abteilung 100. 

Panzer Abteilung 100 was a training unit with a motley collection of captured French tanks and at least one Panzer III G, presumably leftover from 1940. The 91st Air Landing Division was formed in January 1944 and subsequently transferred to Normandy. It was deployed to protect the base of the Cotentin peninsula. It was basically a conventional infantry division, despite the “Air Landing” designation. Although Allied intelligence rated the division as “second rate”, most of its troops fought doggedly. 

Cam and I will both be commanding company-strength forces of three platoons plus support. Using details provided in the Campaign Book, and also the "At the Sharp End" campaign rule book, we rolled random personalities for our senior leaders. 

Campaign Setting and Structure 

The campaign book author, William Thorpe, writes:

“After I wrapped up writing my Carentan campaign, I was most interested in researching the exploits of the 82nd Airborne that also dropped into Normandy on D-Day. The German armored assault that was repulsed at La Fière was striking to me in how it was critical to both sides’ military endeavors: for the Germans it was their avenue for tanks to reach Utah Beach, while for the Americans it was their way to breakout and expand the Normandy front.”

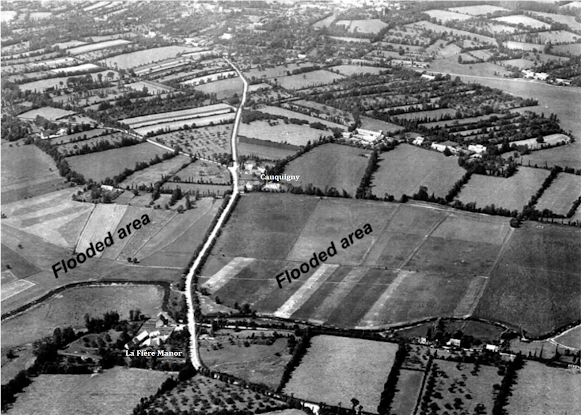
This Chain of Command campaign focuses on a causeway across the Mederet River. Many of the areas at the base of the Cotentin peninsula had been flooded by the Germans. Access between the beach and inland areas was over a small number of narrow causeways. These causeways became strategically vital because the Allies needed them to push inland, and the Germans needed them to send reinforcements to Utah Beach. 

The small La Fière bridge and its connecting causeway were vital during the early D-Day operations because they were the main link between separated elements of the 82nd Airborne Division. On the western side of the causeway was the medieval church and hamlet of Cauquigny, and on the eastern side was the small stone bridge of La Fière and a manor house of the same name. 

The US Airborne, having landed the night before, took the bridge on D-Day and held it until relieved, despite determined German attacks to retake the causeway and bridge. 

The campaign has four scenarios.  If the Germans win Scenario Four on or before Campaign Turn Seven, they win the campaign. If the Americans stop the Germans, they win the campaign (which is the historical result). In other words, the Germans need to capture both sides of the causeway including pushing the American paratroopers out of La Fière Manor before Campaign Turn Seven. 

This pre-war photo shows the area (before the fields either side of the road were flooded by the Germans):
Source: Murphy, 2009


Reading list

There is a good description of the La Fiere battle here

Other good sources are: 

Robert M. Murphy, No Better Place to Die (Casemate, 2009). 

Steven J Zaloga, Utah Beach & the US Airborne Landings (Osprey, 2012).

US Army Centre for Military History, Utah Beach to Cherbourg: 6 - 27 June 1944 (American Forces in Action Series) (first printed 1948, now available online). 


"29, Let's Go": Turn 4, Flanking attack at St Germain-du-Pert

  "29, Let's Go!": Turn 4, Flanking attack at St Germain-du-Pert The US column cannot advance with the threat of mobile anti...